This is free.
Timber Harvesting in New Zealand:
A guide for Small Scale Forest Landowners
By Rien Visser, NZ School of Forestry, December 2016.
Introduction
Plantation forests occupy about 7% of the NZ land area and forestry and logging employ about 7,000 people directly. About 50,000 ha., or 25 million m3, is harvested each year. A lot of interesting details about our forest industry can be read in the NZ Forest Owners Association Fact and Figures and a detailed breakdown of ownership is published by MPI in the regularly updated National Exotic Forest Description (NEFD 2015). About 20% of NZ planted forests are in holdings less than 100 hectares and over 50% of timber harvested will come from forest owners that are not large commercial forestry companies.
For any forest owner, timber harvesting is an exciting, but challenging time. It is the realisation of a long term investment, but also a time of very intense management, significant costs, as well as a sudden change to their landscape. It is also a time of increased legal responsibility with regard to safety of the people working in their forest and the protection of the environment. A clear caveat to the information provided here is that for all timber harvesting professional advice should be sought.
Timber harvesting typically refers to the physical process of cutting, extracting and processing trees into logs that can be loaded out onto trucks and delivered to market. The market may be a local sawmill, but most commonly in New Zealand harvested logs are delivered to larger processing plants or to a port for export. While a small scale forest landowner is typically not directly involved in the physical process of harvesting, they will at least be directly involved in choosing a company, consultant or contractor that will undertake the task, as well as in the harvest planning process.
To make an informed contribution to planning for harvesting and selecting the harvesting contractor (also known as a ‘logger’), being familiar with the capabilities of the machines and systems that can be selected to carry out a harvest will be very beneficial. Therefore, an overview of the steps required to make a harvest plan is followed by a section on machinery and systems that may be used to carry out each step of the harvesting operation.
For those not familiar with timber harvesting and the landscape change it brings, a company working in Northland has made a short time-lapse video of a small 25 hectare forest being harvested (Gary Leslie – NFP).
This document is divided into three main segments:
- Safety and the Environment provides a brief overview of what is required to be responsible for a safe operation and what it takes to meet environmental protection requirements. These are legal requirements for a forest landowner.
- Harvest Planning is a guide for the key steps where a forest owner will be involved in the harvesting process. This will include making a pre-harvest plan, a site specific harvest plan and carryout out post-harvest audits.
- Harvesting Machines and Systems is intended to be educational in that it provides an overview of: the four main steps involved in harvesting; common harvesting systems used in New Zealand; and developing the required infrastructure such as roads and loadings for harvesting to take place.
Safety and the Environment
Safety
Timber harvesting has been, and unfortunately continues to be, a dangerous task. The new Health and Safety at Work Act (HWSA 2015) makes it clear that all Persons Conducting a Business or Undertaking (PCBU) have a responsibility for safety. A landowner engaging in a timber harvesting activity is by definition a PCBU and should actively take part in ensuring health and safety of the people working on their land. It is unlikely that a small scale forest landowner will have the expertise to develop a detailed health and safety plan for the timber harvesting operation. The most prudent option is to engage with a professional forestry company, consultant or contractor to ensure they have the appropriate health and safety plans in place.
The forest industry has been working hard at improving its safety record and have a dedicated Safety Council. A comprehensive review of the forest industry was completed by an Independent Panel and a summary document outlining some of the main shortcomings, as well as an agenda for change, was published (IFSR 2014). A number of initiatives have been undertaken including setting up ’Safetree’ a website that provides resources such as documents and videos on how to complete timber harvesting safely.
WorkSafe, which is the New Zealand regulator for health and safety, have published a great document entitled “Managing a Safe and Healthy Small Forest Harvest” that provides an excellent resource in terms of practical step-by-step guide for managing your harvest. For example, one task the landowner must complete is the identification of hazards on the property and making sure they are communicated to the logger. Examples of hazards on farm woodlots can be fences, proximity to powerlines, but also the strength of stream crossing structures. You are also likely to be responsible for the safe access to the forest on the farm, so if the farm roads and tracks leading to the area to be harvested are steep and not accessible for a logging truck in wet weather, then you need to take action to restrict access.
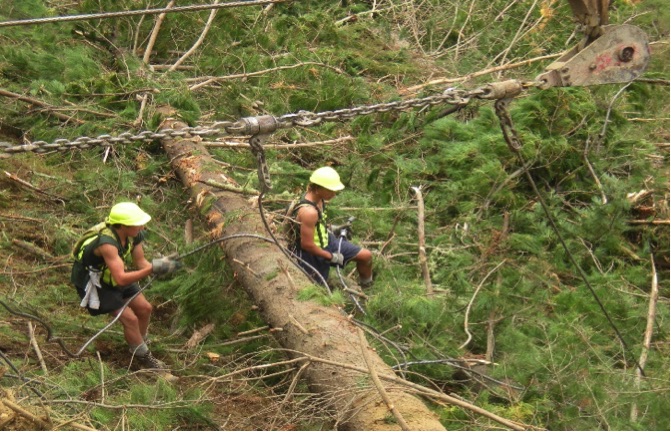
With regard to the individual harvesting tasks, there is an Approved Code of Practice (ACOP 2012) for forest operations that is considered a minimum standard, and it includes the expectation that all workers are both trained (or in training) and competent in carrying out the designated harvesting task. Best practice guides are also available from various sources including for higher risk practices such as manual tree felling or choker-setting (known colloquially as ‘breaking-out’ in NZ), or complex harvest systems such as cable logging.
Environment
All landowners in NZ have an obligation under the Resource Management Act (RMA 1991) to look after their land – or what most will refer to as having sustainable land practices. A good overview of the RMA is provided on the Environment Guide website. The actual implementation of the RMA, and how it affects a landowner, is the responsibility of the Regional and District Councils and will be written down in their Plans. Regional and District Plans tend to be very large documents that to a layperson is hard to decipher. However, it is a legal requirement to comply with those plans. While each Region in NZ has different requirements, in most regions a Resource Consent is required for larger scale earthworks (i.e. building roads and landings) and a Resource Consent may also be required for undertaking timber harvesting (typically referred to as ‘Vegetation Removal’ in the plans). You can expect a professional forestry company, consultant or contractor to be aware of environmental requirements, but as a landowner about to undertake either earthworks or harvesting it will be prudent to make sure someone has contacted the Regional Council to ensure compliance requirements are met.
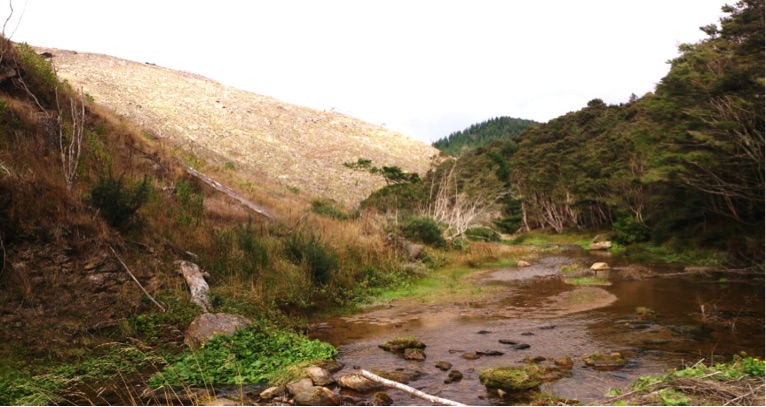
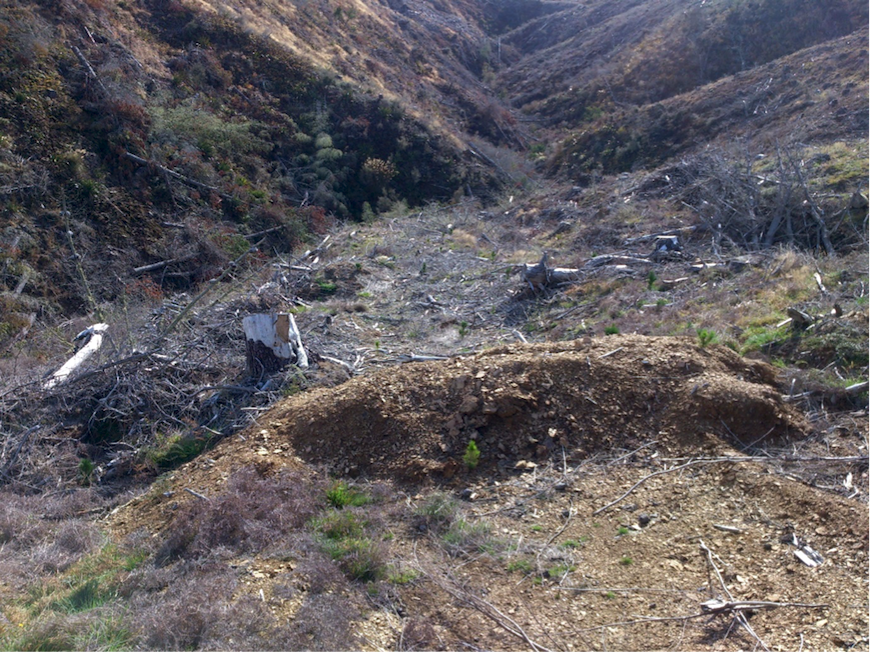
The most common environmental impact from timber harvesting is exposing soil to erosion. When soil erodes from the land it can enter waterways, a process call sedimentation, that affects both water quality as well as aquatic habitat. In addition to any rules or guidelines that Councils make available, a good reference book and guide for minimising environmental impacts is the Environmental Code of Practice (NZFOA 2009). This was published by the NZ Forest Owners Association and provides clear bullet point list of tasks such as planning, road building and harvesting. Another common concern is the risk of harvest debris (commonly called ‘slash’) entering a waterway either during the extraction process, or when accumulated at a landing or roadside where it might slide downhill during a rainstorm. Again, these risks can be minimised by following the recommended best practices.
Planning for Harvesting Operations
No harvest should ever commence without developing a harvest plan first. The harvest plan is not just a map, if done well it should be a critical part of the contract with the company / consultant / logger that sets out the expectations in terms of when and how the harvest will be carried out. Managing safety, for example how the logger with avoids or mitigates known hazards, should be in the plan. The WorkSafe Good Practice Guide has two chapters - ‘2. Steps to Planning a Harvest’ and ‘5. Completing the Harvest Plan and Risk Management’ that should be consulted and provides a comprehensive list of items to address when developing the plan. A detailed harvest plan also includes the physical characteristics of the operation such as layout of roads and landings, as well as specify the individual harvesting steps.
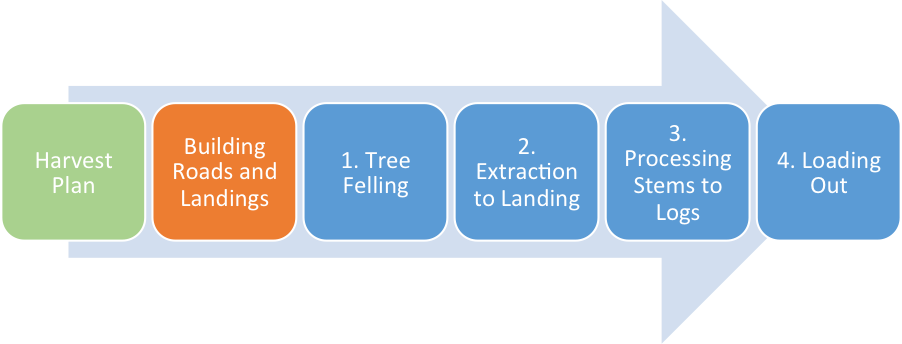
The harvest planning process is complex and has many aspects. It involves several interrelated processes carried out over a large and sometimes highly variable area, often taking several weeks or months to complete. Money and time spent on effectively planning a harvesting operation is nearly always recovered during the harvesting operation. Developing a harvest plan begins with understanding the forest being harvested, the intended market for the material, and the available resources required to get the material from the forest to the market. It will finish with the successful completion of the harvesting operation. For simplicity it can be broken down into four main steps:
- Pre-harvest planning – is a process where the consideration is given to harvesting a forest area, looking at the main factors such as the overall financial feasibly, access to the forest, availability of harvesting contractors and state of the market, as well as deciding which professional consultant, company or harvesting contractor to engage with.
- The Harvest Plan – is a document and a map that provides clear guidance as to where the roads and landings should be located, what harvesting system(s) to be used. It should also show any hazards that were identified in the planning process, as well as note any environmental (or resource consent) requirements.
- Building roads and landings.
- Post-Harvest Inspection – where the landowners satisfies themselves, through a site inspection, that the work has been completed to a high standard.
1. Pre-Harvest Planning
Many larger forest owners will have a long term Forest Management Plan that sets out the objectives of the forest as a whole and identifies what areas are scheduled for harvest. For very large well established estates they may have a sustainable harvest volume that provides regular income and work for their contract loggers. Smaller scale forest owners tend to be more flexible with regard to time of harvest – a period that can span 5 or more years. This can depend on their financial requirements, but also on current markets for their products or factors such as logger availability.
Pre-harvest planning involves bringing together information (where available) such as contour maps, aerial photographs and or Google Map printouts, maps showing stand boundaries and existing road infrastructure, stand inventory data and soil description, to name a few. During the planning process any known hazards should be recorded. These may include tomo holes, power lines, fence lines, windthrown or dead standing trees. At the earliest possible stage you should also contact the Regional Council with regard to Resource Consent application requirements.
While many forest owners will be looking to maximise their financial returns, careful consideration should be given to other values such as soil and water, aesthetics, wildlife, historic and cultural sites, neighbouring properties. A description of these values and a process by which to evaluate them is presented in the Environmental Code of Practice (NZFOA 2009).
The most important aspect of pre-harvest planning is walking the proposed harvest area with the professional you intend to engage to plan and manage the harvest itself.
With a good knowledge of harvest system options and their limitations (see next section), and combining that with the stand and terrain information, it is possible to start identifying the type of operation best suited to the site. It is also possible to start sketching some possible draft harvest plans that identifies likely road and landing locations so that they can be walked to check for construction feasibility. If obstacles such as rocky outcrops, unstable slips and water are found it is much easier to move the road on the plan than it is to move it during construction!
2. Harvest Plan
A detailed harvest plan will typically have two components. The first part is a document where per-harvest planning considerations, safety and environmental expectations are all written down to be part of the harvest contract. For example, if you wish that the logging contractor removes the wood waste from the processing areas, or restore any fences that were pulled down during operations, then this needs to be in the plan and contract. Also, if harvesting needs to stop for stock movement, this should also be shown. It also allows the logger to cost it into their operation.
The second key component of any harvest plan is the map. It should be a contour map showing as much terrain detail as possible. During the planning process many different road and landing layout options should be considered so that the best one can be identified. Modern maps are made in GIS software and can be readily changed or modified as required.
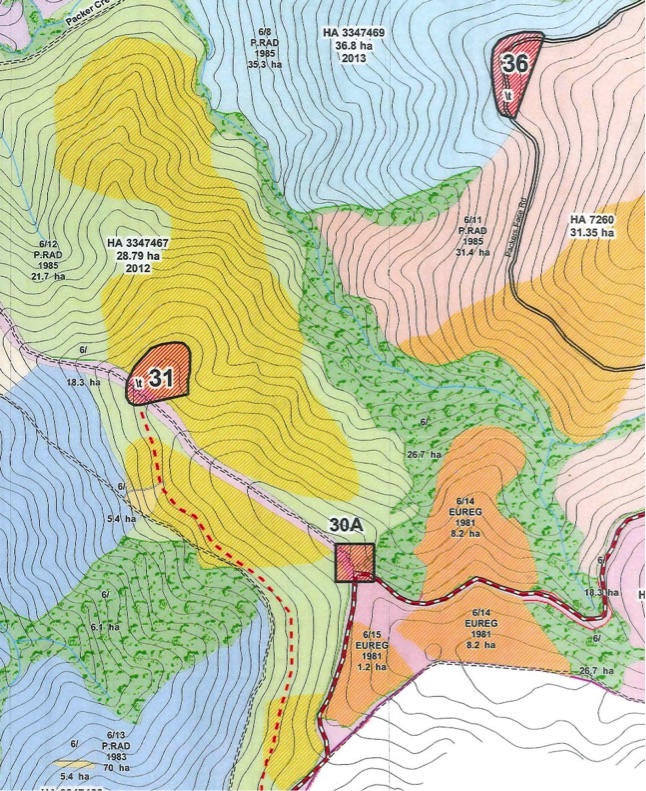
The map should show as a minimum:
- Harvest area boundary: should be clearly and accurately displayed, following topographic features where possible.
- Existing and proposed roads: including the standard of road, as well as features such as cross drains or stream crossings.
- Landings, including the size of the landing to be constructed. If multiple landings are used in a harvest area the map should clearly show the direction of skidding or yarding to the landing.
- The desired harvest system (ground based or cable yarding) and their operating limits (such as slope or extraction distance) identified.
- Sensitive areas such as streams, wet areas, structures, etc.
- Any buildings, fences, power lines etc. that need to be protected during harvest.
- For cable logging harvest plans it is also important to show the intended span (i.e. location of the skyline).
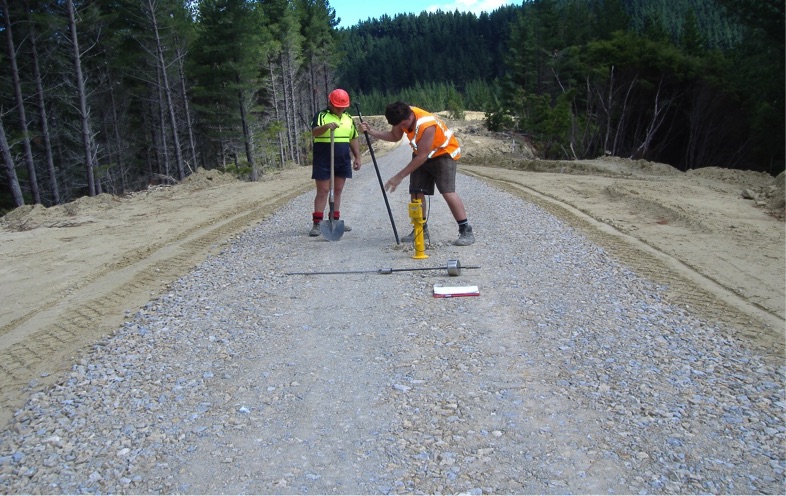
Once a harvest plan map has been established it is important to walk the intended harvest area. The planned roads and landings can be flagged in. For roads it is very important that they are not too steep, as trucks will struggle to get up. A guide is a maximum 18% slope for unloaded truck (i.e. going uphill towards the landing), but only 14% slope for loaded trucks (i.e. heading downhill and out towards the public road).
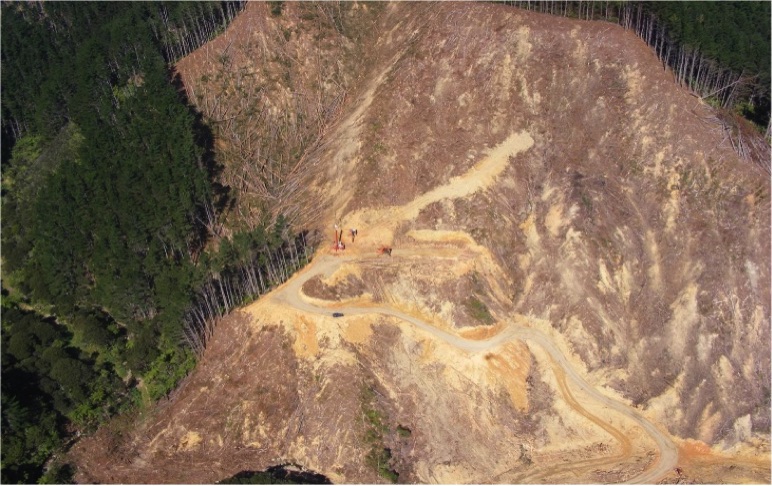
3. Building Roads and Landings
Building roads and landings are not technically part of the harvesting operation; however overall efficiency is dependent on trucks being able to access the landing to remove the processed logs. The landings being both placed in the right location as well as the correct size, so the crew can safely and effectively process the extracted stems, is also an important consideration.
Roads
A term commonly used for designing forest access roads is ‘fit for purpose’. The larger the harvest area, the more trucks that can be expected to pass over the road, the higher the standard of road required. A higher standard forest road (called ‘secondary’) can be very expensive to construct, costing on average about $100 per metre, while a lower standard of road (called a ‘spur’ road) that is just used to access a single landing is only $40 per metre. However, roading costs vary widely depending mainly on the difficulty of the terrain, the soil type as well as access to aggregate. One important trade-off in deciding a road standard is that saving money on road construction increases the risk of the operation being halted due to bad weather. While people often think about rain closing down a harvesting operation, the most common reason for having harvest delays due to weather is that the logging trucks cannot access the landing.
Building roads depends on a lot of complex factors including soil type, terrain slope, available pavement materials (aggregate) and available machinery to construct it. A very good basic guide to many aspects of forest road building is the Forest Roading Engineering Manual (NZFOA 2012). This reference can really help in understanding options, design criteria and equipment used to construct the road. Regardless of cost, one minimum standard that must be met is the protection of the environment. Roads and their associated embankments and fill slopes are invariably at risk of erosion, especially when used in wet weather. A very practical way of being involved in ensuring that roading standards are being met is to use the Road Engineering Operators Guide (NZFOA 2014). It shows pictures of ‘good’ (and ‘poor’) practices that is an excellent resource for inspecting roads, especially near waterways.
If the area to be harvested is small, but requires a lot of new road to access, a preferred option may be to ‘two-stage’. Two-staging refers to the stems being extracted to a much smaller landing (typically called a ‘pad’), where they are then transferred to a robust hauling machine such as an off-road truck that can work on much lower standard roads such as a typical farm track. The processing area is then placed in a location closer to the public road.
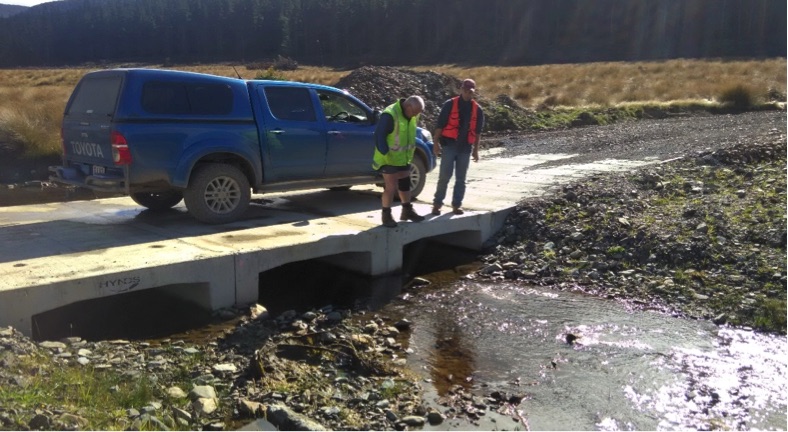
Particular attention should be given to the design of any stream crossing. While culverts are typically used for smaller waterways, bridge options are required for streams or rivers. Maintaining the integrity of the streambed, or at least ensuring that a stream crossing is installed in a way that allows aquatic species to migrate through, is an important design consideration and typically a legal requirement for any crossing over a fish bearing waterway. Most crossings will require a resource consent from the Regional Council and they will have specific design criteria that must be met.
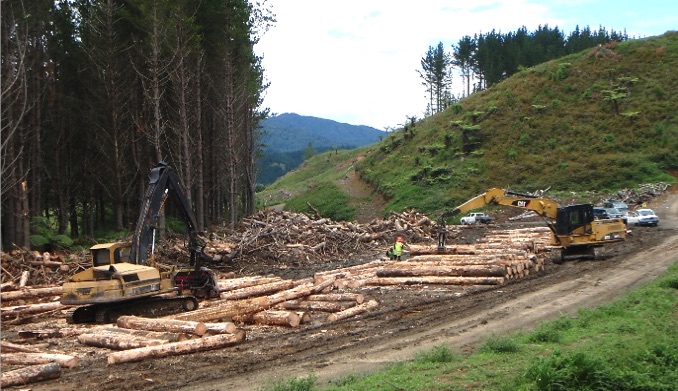
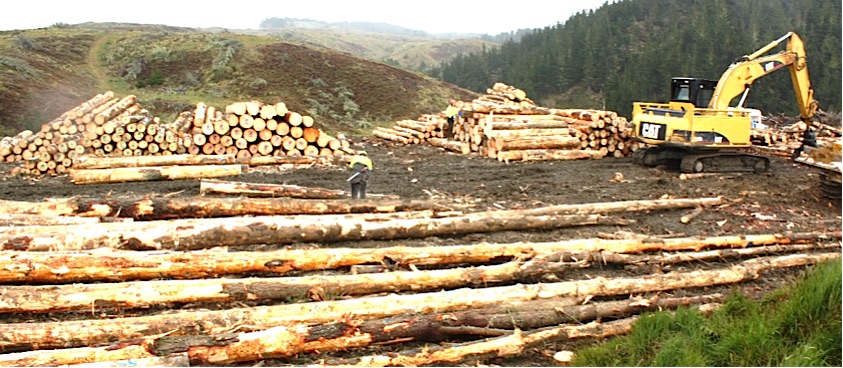
Landings
The landings (also called a ‘skid site’ or a ‘deck’) is the designated area in the forest used to further process stems or trees extracted from the forest, store them, and then load out the logs. This designated area is usually cleared of obstacles such as trees and or stumps, and can vary in size depending on the processing, storage and loading out requirements.
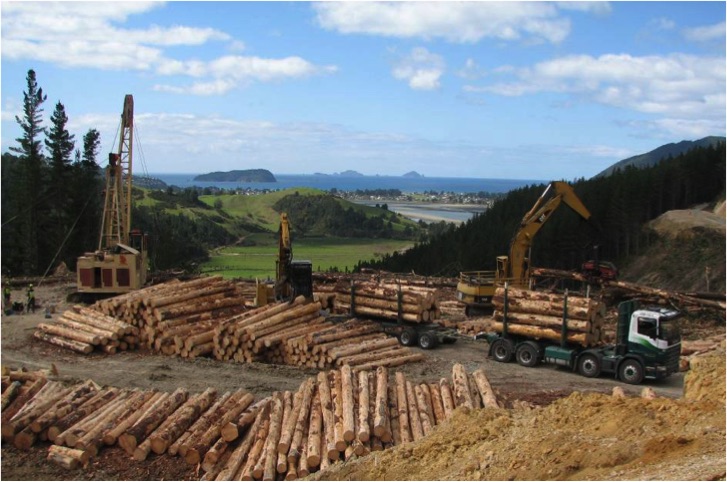
The landing will accommodate the processing machinery and should be laid out for an efficient flow of logs. While most NZ harvesting crews process the logs using machinery, smaller crews may still use ‘skiddies’, referring to workers whose primary task is cross-cutting the stems into logs using chainsaws. When skiddies are working on a landing there should be clear separation between them and the machinery. Landings must also have enough space to accommodate the log stacks, the log loading equipment as well as the logging trucks. A study of NZ landings showed that the average landing size in NZ plantation operations was 4000 m2, with the smaller ones being 2400 m2. This equates to a design area of 40 m x 60 m. Key factors that influenced the size include the system productivity, number of log sorts, as well as the type of loading machine used. Front front-end loaders need more space to operate effectively compared to excavator based loader.
An important planning consideration is the location of the landings. They are generally placed in the middle of the harvest area to minimise extraction distance as this will reduce harvesting cost. For many smaller scale forest operations using an existing cleared area (i.e. neighbouring paddock) may be the best option to minimise roading and land clearing costs.
4. Post-Harvest Inspection
Is not appropriate for a landowner to be physically present during the harvesting operations as this will interfere with efficiency as well as safety. However, it is prudent to schedule regular inspections to ensure harvesting is going according to the harvest plan. If the landowner does not do this personally, the consultant or company they have hired should complete this task. The Farm Forestry ‘Treegrower’ magazine has a number of articles where woodlot owners share their harvesting experience. For example Gavin Adams shares his experience in the November 2016 issue suggests that with better planning, a clearer understanding of expectations, as well as improved communication during the harvest many disappointments can be avoided.
Upon completion of harvest the following aspects should be checked:
- Merchantable timber: Logs may be left in the cut-over or landing, so check that all logs of value have been trucked out to market.
- Slash / off-cuts: harvesting generates a lot of waste – typically about 8-10% of the total volume will be in branches or off-cuts. Check that this material has been managed appropriately. Many landowners prefer slash to be returned to the cut-over as it recycles the nutrients and to avoid a fire risk at the landing. However, slash distribution over the site should not impede subsequent planting. A clear risk is leaving slash over the side of the landing on steep terrain. This is commonly known as a ‘birdsnest’ and in a rainstorm there is a real risk of failure, that is, sliding down the hill into the waterway (Debris flow). All birdsnests should be pulled back onto the landing upon completion of harvest.
- Environmental controls: all tracks and or roads where soil is exposed is at risk from erosion. The Environmental Code of Practice lists Best Environmental Practices for Earthworks and Harvesting. For example, old skid trials should be closed out using waterbars. A waterbar is put in by an excavator and forces the water off the trail at regular intervals.
Harvesting Machines and Systems
Trees are large and heavy and for cost-effective harvesting the system must be able to handle them quickly, efficiently, and safely. Prior to mechanisation (which refers to the use of machinery), trees were felled using either axes or crosscut saws and the processed logs were brought to the mill using a combination of gravity, animal and water power. Some great old video footage is readily found on the internet (i.e. From Stump to Ship). Chainsaws were first developed in the 1930’s and during the 1950’s tractors (bull-dozers) were starting to be commonly used for timber extraction. Over time, more purpose built equipment was designed and constructed, and loggers today can choose from a wide range of equipment.
To choose the right harvest system for a particular forest we need to match the equipment to the stand and the terrain conditions. For simplicity, it is possible to break down the timber harvesting into four practical steps: Felling, Extraction, Processing and Loading Out. A number of options are typically available to complete each step of the harvesting process and it is important to understand the advantages and disadvantages of each option. It is impossible to describe and discuss all the various machines and systems that have been used in the harvesting process, there have been too many! There are always new and exciting ideas being tried out to improve the harvesting process. The system chosen should ensure that:
- it is physically feasible to carry out the operation,
- it is both safe for the people involved and low impact on the environment, and
- it is cost effective.
Timber Harvesting step 1: Felling
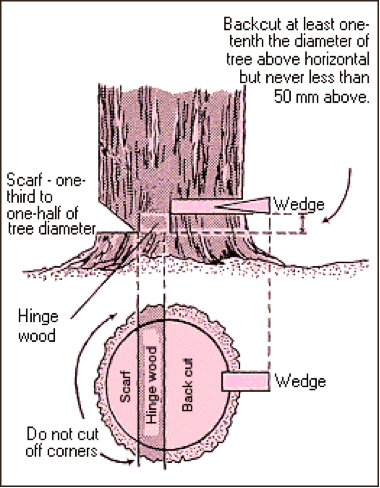
Felling is defined as “severing the tree from the stump and bringing it to the ground”. This can be done ‘motor-manually’ (a person using a chainsaw – also called simply ‘manual’ felling as the day of true manual felling with an axe is long gone) or ‘mechanically’ with a felling machine. Once a tree has been felled it is typically referred to as a stem.
Important factors to consider when felling a tree include minimising breakage (i.e. by not felling them across other trees or rocky outcrops), in a manner that assists the subsequent extraction (i.e. with the butt end towards the landing) and minimises the impact on the site (i.e. keeping them out of waterways or away from native vegetation that can be protected).
Modern chainsaws are not only light and powerful, but they have many safely features to prevent injury, as well as anti-vibration features that limit long-term harm to the operator. Manual chainsaw felling was the preferred option for many decades. Chainsaws are relatively low cost and easily maintained or replaced and a skilled worker with a chainsaw is capable of operating on any terrain, including steep slopes and in areas with very soft soils that can limit many machines. Chainsaw felling is also likely to be the only option for very large diameter trees; most felling heads are limited to about 80 cm diameter trees.
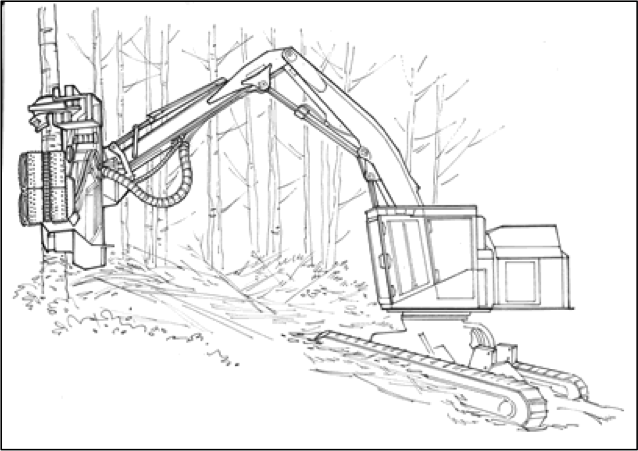
As machinery improved, mechanised felling proved to be more cost-effective on flat or rolling terrain. This means the additional cost of operating a machine to complete the felling task was offset by increased productivity. The most common machine used for felling in NZ is a (modified) excavator base with boom attached called a felling head. Felling heads can be a simple grapple with saw arrangement, but they can also be highly complex (and expensive) that can not only cut, but also delimb, top and process the stem into logs.
An important aspect of all machinery used in timber harvesting operations is they must meet strict requirements to keep the operator safe. Two important cab features are ROPS (rolling over protection) and FOPS (falling object protection) structures. The cab must also have guarding to protect the operator from ‘chainshot’. Chainshot is when a small segment of the cutting chain breaks off and is fired out of the head at a speed that can readily kill a person. A rule of thumb is to stay at least 75 m away from a felling or processing operation and never to be in line with the saw. If you see the chain – you are in a dangerous place!
While felling is safer with a machine, machines are limited to rolling terrain with few obstacles. One innovation where NZ is paying a major role is the development of ‘cable-assist’ operation. A machine (bulldozer or excavator) with a winch is anchored at the top of the hill and lowers the harvesting machine down the slope. This allows them to operate on very steep slopes; when conditions permit up to 45 degrees!
While felling simply refers to cutting the tree down, depending on the machine option, a number of processing tasks can be completed “at the stump”.
There are a number of advantages:
- Removing top and limbs as they have no value to avoid the additional extraction weight.
- Making the trees easier to extract by reducing their size if too large or by changing their shape if too awkward (removing large branches).
- Creating a slash mat so that the machine(s) drives over a slash mat to reduce soil compaction and/or rutting.
- Recycling nutrients back into the soil – nearly 90% of the nutrients are in the bark, branches and leaves/needles of the trees.
- Avoiding large piles of slash at the landing.
Although typically bucking the stems into logs can be done more efficiently at a landing area, in some operations the stem is processed into logs ‘at the stump’. This is referred to as “cut-to-length” operation. In addition to benefits listed above, cut-to-length has the benefit of not needing a landing for processing. The extracted logs are typically stored at road-side for loading onto trucks.
Timber Harvesting step 2: Extraction
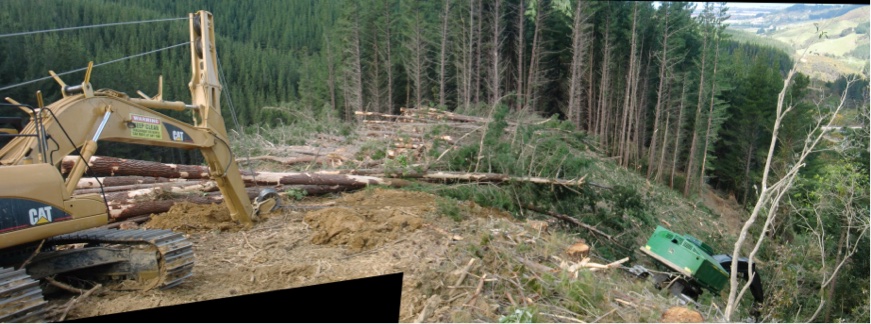
Extraction is the removal of the stems from the forest area to a landing (or logs to roadside in cut-to-length). This is often the defining function in the forest operation. If machines are used that move along the ground it is referred to as ‘ground-based’, whereas if the stems are extracted with wire ropes that are suspended in the air it is called ‘cable yarding’. Because of very high costs, only in exceptional cases will a helicopter be used, and then it is referred to ‘aerial logging’.
The US Forest Service has made three excellent short videos that both demonstrate the ‘Ground-based Harvesting’, ‘Skyline Cable Yarding’, ‘Helicopter Yarding’, providing an overview, advantages and important factors to consider when working with these systems (USFS harvesting video website)
Ground-based
Ground-based harvesting is the most common extraction method because it typically is the lowest cost and highest production option. If the stems are dragged along the ground the processing is called ‘skidding’. If the stems (or logs) are lifted onto a trailer for extraction then the process is called ‘forwarding’.
Skidders
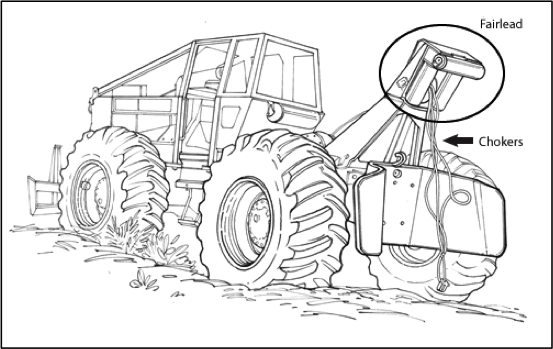
The first skidders were simply modified bulldozers that became popular and common in the 1950's as an effective way of extracting timber from the forest. Several modifications have taken place over time to fully convert the basic bulldozer into a modern skidder. In addition to modified bulldozers, articulated rubber-tired skidders were developed, being faster and more manoeuvrable. They may use a cable with chokers (called a ‘cable skidder’), or a grapple (called a ‘grapple skidder’), or to hold the stems; some machines have both.
The cable skidder is still the most versatile form, whereby a cable winch mounted to the body of the skidder is used to pull the logs. The cable skidder does not need to drive to each stem to pick it up. The cable is fed over the arch through a fairlead. The fairlead is typically a series of rollers that reduces the wear on the cable. As the cable skidder gets close to the stems the operator needs to dismount and attach the chokers. The winch pulls the logs in to the skidder. It does take more time to attach the logs and unhook the logs at the landing and requires the operator to get out of the safety of the cab.
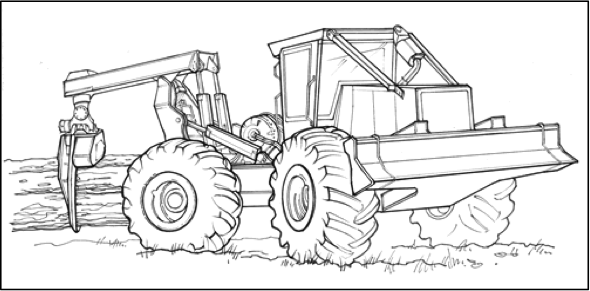
A major improvement made to skidders was an attachment known as a grapple. Where you can back the skidder to the stems that need to be extracted, the grapple skidder is both safer and more productive as the operator does not need to leave the cab. As such they are limited by their ability to reach the timber, but typically very well suited to mechanized felling as the stems are typically laid out in bunches (pre-bunched).
As a guide, rubber tired skidders can start to slide on slopes of 30% if the soil is weak or wet, and tracked machines can go up to 40%. The operating range of skidders can be improved to work on steeper slopes by putting chains around the tires, or they can work on weaker or wet ground slopes with wider tires. Typically the upper slope limit of a skidder working on strong soils is 50% - but that is only with an experienced operator.
Forwarder
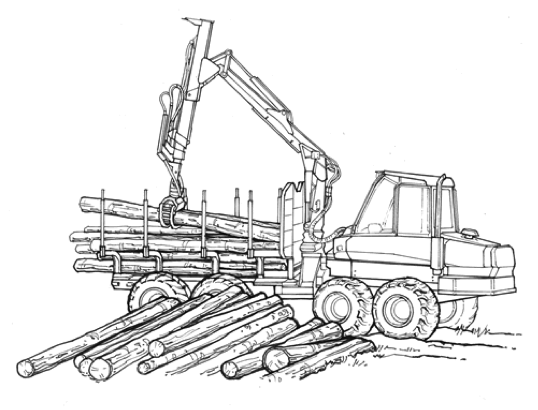
Forwarders are articulated machines consisting of an operator’s cab and a log bunk, basically a tractor pulling a wagon load of logs. While forwarders can extract stems, they are more suited to ‘cut-to-length’ harvesting where the trees are already processed into logs at the stump. The most common forwarder configuration has eight wheels (two sets on each articulation). The cab may be fixed or capable of rotating on the chassis. Modern forwarders come with a rotating operator seat and controls as they face forward when driving, but face the rear when loading. Most forwarders have a boom mounted grapple for loading and unloading material.
Forwarders typically have a lower ground impact, making them a preferred extraction machine in Europe. For extraction, they are typically more expensive than the skidder over shorter distances and hence the NZ preference for skidders. However, factors such as longer extraction distances, the desire for lower levels of ground disturbance, or when working with fewer log sorts, a forwarder may be most suitable. These are all factors that are more prevalent in smaller scale harvest areas and as such forwarders are not an uncommon option for small woodlots.
Tony Brand, a logging contractor working in Canterbury has posted a short video of his system that combines an excavator based harvester with a forwarder.
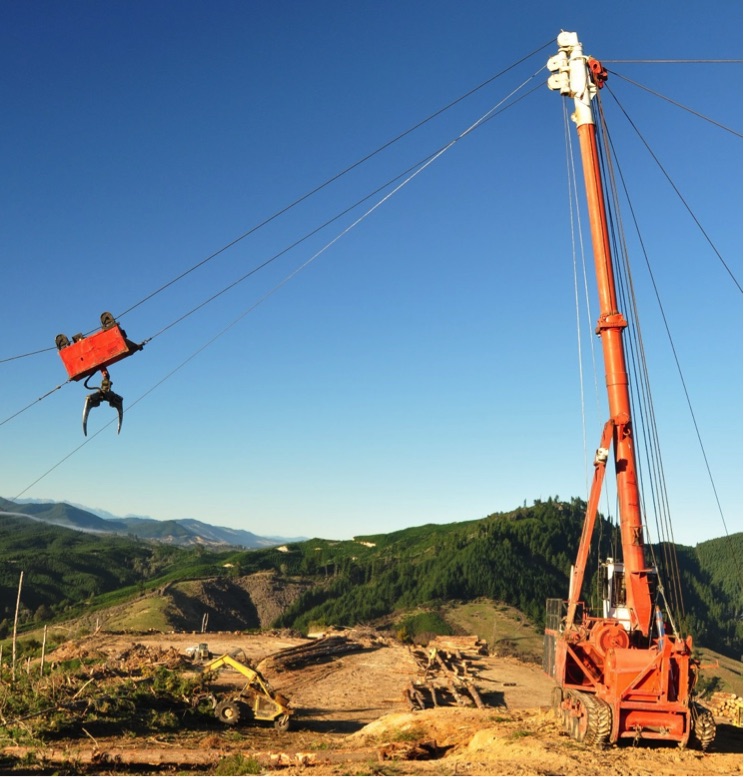
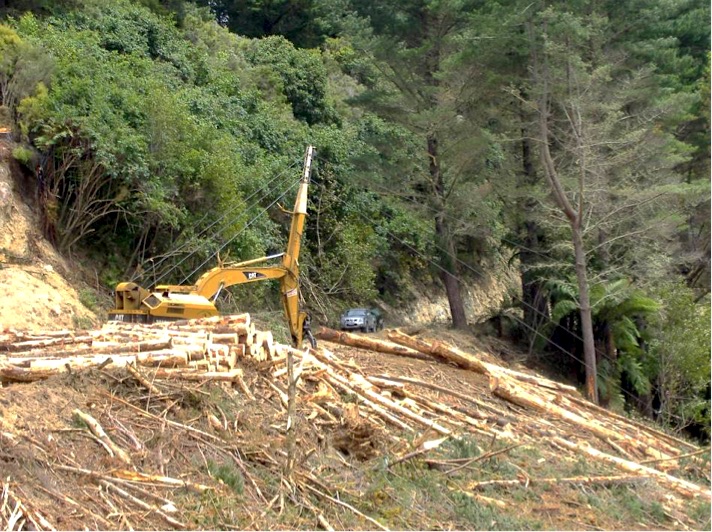
Cable Yarding
Cable yarding is typically only used in steep harvest areas where ground-based equipment cannot safely traverse the terrain or soil conditions limit the use of ground-based machinery. As the name suggests, cable logging relies on the use of cables to extract timber from the forest. It is the one system where the primary piece of extraction equipment (in this case the yarder) is not moved in and out of the stand – and is therefore considered a very low impact system. It uses the least amount of fuel of all extraction systems (per unit of wood extracted). However, cable yarders are expensive machines to purchase and run. They require detailed planning and long set-up time, and typically are slower than ground-based systems. This combination means the cost of operating a cable system is considerably greater than a ground-based system, but still cheaper than a helicopter system.
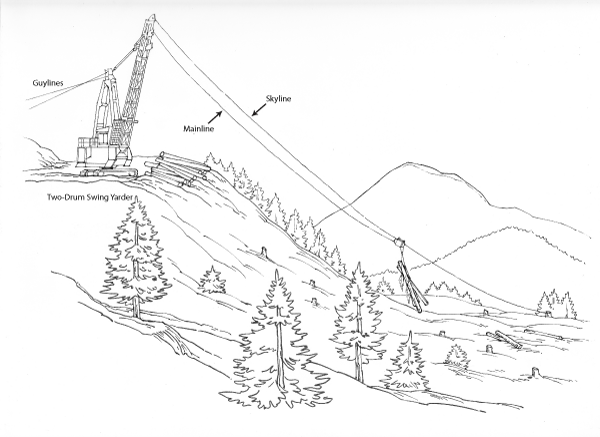
A cable yarder will have either a wheeled or tracked base for mobility, a tower to keep the cables off the ground (called ‘providing lift’), and a series of winches to pull (or brake) the cables. There are many different types of cable yarders, and many different ways to rig them. A good overview of the many options are in the NZ Cable Logging Best Practice Guide or in the Oregon Yarding and Loading Handbook.
A basic rigging configuration involves a single larger cable (called the ‘skyline’) that is stretched from the yarder across the valley and attached to either a stump or a machine. Another line, the ‘mainline’ is attached to a carriage that runs along the skyline. A third line might be connected to help pull the carriage out along the line, and this is called the ‘haulback’ line. Most yarders will need guylines to hold up the tower. Many aspects of operating a yarder are covered in the Approved Code of Practice (ACOP 2012).
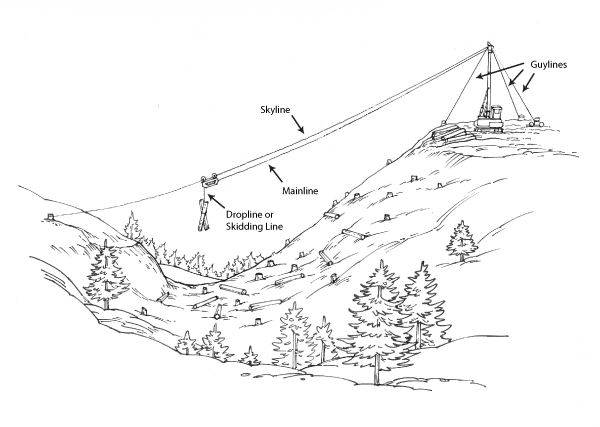
There are over 300 yarders working in NZ, most are ‘tower yarders’ but about a third are ‘swing yarders’. A tower yarder has a vertical tower that is stationary and typically much taller than a swing yarder. Their advantage is that they provide more lift, and are typically able to extract longer distances (up to about 500 m) and still be cost effective. However, they need larger landings and longer set-up times. The swing yarder has a shorter forward leaning boom that it can use to swing the stems up on the landing. As such it requires smaller landings. These machines tend to be very fast and effective for shorter extraction distances less than 350 m.
One option that may be considered for smaller harvest areas are modified excavator yarders. They tend to be easy to relocate and set up, but are typically slower and can only extract smaller payloads.
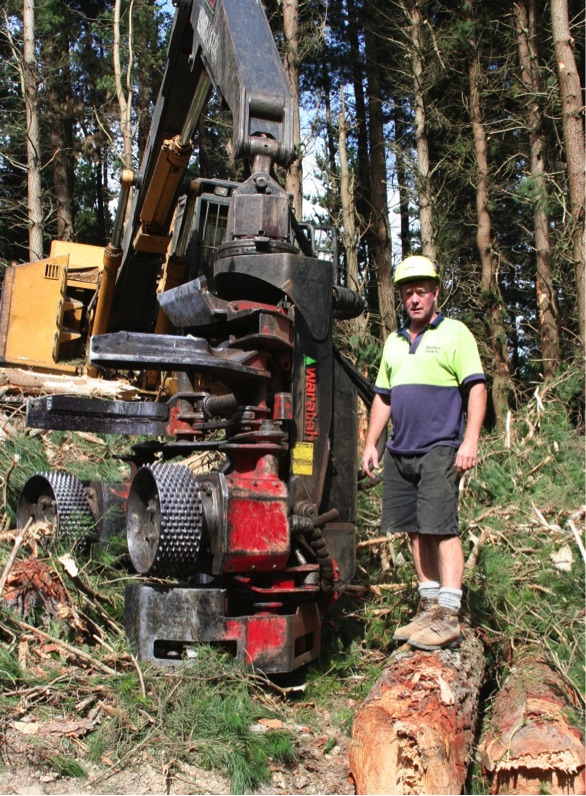
Timber harvesting step 3: Processing
Processing is a very important step in the harvesting process, as that is where the real value can be recovered from the tree. With so many different local and export processing options, most harvesting operations will process the stems into 10 or more different log sorts. A log sort is defined by both quality, and physical dimension characteristics (such as length and diameter). A nice overview of the different grade types, and what they are used for, is provided by NZWood.
Processing on the landing is typically done by a machine – being an excavator with a processing head attachment. These machines can delimb by using powerful rollers to pull the stem through the knives (also the holding arms of the head). All processing heads have both length and diameter measurement capability and this data is fed into the on-board computer. It is typically done in 10 cm increments so a high level of detail is provided for the computer to optimise the cutting strategy for the stem.
If the stems are processed on the landing by chainsaw, then it is the log-makers task to decide how the stem should be cut. They will have a tape to measure length and callipers to measure diameter, and use a set of cutting instructions to decide which log sort to cut. The advantage of using a log-maker, instead of a machine, is that they can better assess the quality of the stems. The disadvantage is that measuring length and diameter is cumbersome, and true value optimisation decisions are limited by the experience of the log-maker.
The term ‘value recovery’ refers to the process of ensuring the optimum amount of value is obtained from the stem. Value recovery has many aspects, including marketing and delivering the timber to the customer prepared to pay the most. Because the harvesting contractors are typically paid by the volume of wood they process, and not the value, an important part of managing a logging operation is ensuring that due care is taken during processing, so that the logs are being cut correctly. A log, if cut too short, will have no value when delivered to the customer.
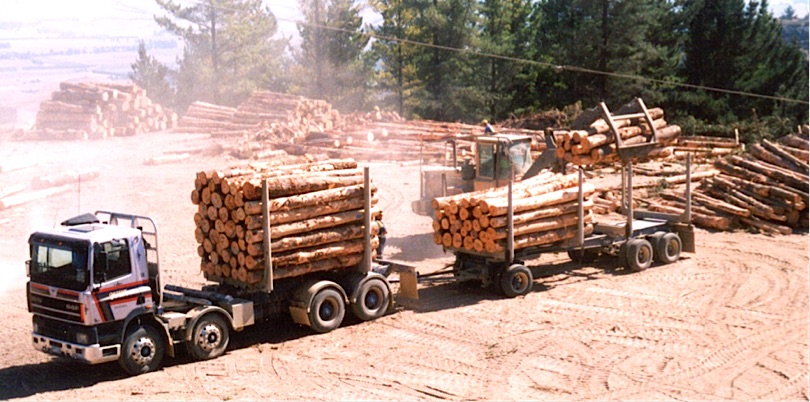
Timber Harvesting step 4: Loading out (and trucking)
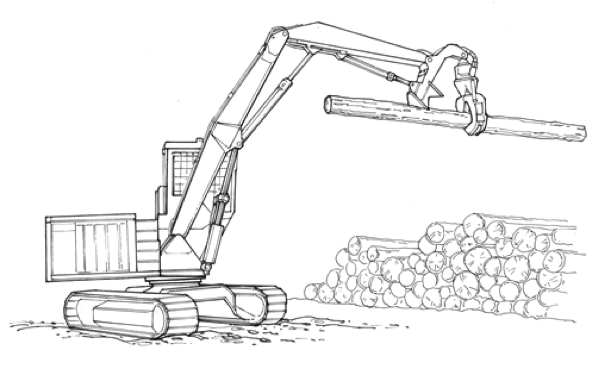
The final step in the harvesting process is loading the cut logs onto logging trucks for transportation to market. An excavator with a grapple (commonly called a ‘loader’) is by far the most common loading machine found in a NZ logging operation. They can work in tight space, such as in between log stacks, and are very good at ‘fleeting’ the logs. Fleeting refers to sorting the logs after processing and placing them into their correct stacks. However, for high production operations, and when landing space allows, a front-end loader is quicker to load the trucks.
One loading alternative that can be considered for smaller harvest, or cut-to-length operations, is the use of a self-loading truck. Self-loading trucks are very versatile in that they can pick logs from the landing or roadside without the need to interfere with the harvesting operation. The reason they are not popular is that the truck has to carry the extra weight of the integrated boom and grapple, which reduces the maximum payload it can carry.